
- Centralized Cryptographic Store: Storing third-party API keys, certificates, and secrets in Azure KeyVault rather than hardcoding them within D365FO.
- Entra ID App Authentication: Using Microsoft Entra ID (Azure AD) App Registrations with Client ID and Secret values for seamless service authentication.
- Vault Access Policy Model: Granting granular KeyVault permissions to authorized users and service principals to maintain least-privilege security.
- D365FO Native Parameters Setup: Configuring Key Vault URL, App Client ID, and custom Secret URIs (
vault://[keyvaultname]/secretname/[secretversion]). - Runtime X++ Secret Retrieval: Calling
KeyVaultCertificateHelper::getManualSecretValue()to fetch decrypted credentials directly into memory.

Overview: What is Azure KeyVault?
Azure KeyVault is a cloud service provided by Azure which allows us to store and manage sensitive data like passwords, API keys, and encryption keys used by our applications.
In modern enterprise software architectures, business applications no longer live in silos. As integrations multiply, managing credentials securely across production, staging, and development environments becomes a critical operational requirement.
“Hardcoding sensitive API tokens directly into application logic or database parameter tables creates severe compliance and security vulnerabilities. Azure KeyVault eliminates this risk entirely.”
The Enterprise Security Challenge
Challenge: Our D365FO application relies on various third-party APIs, each requiring unique API keys for access. These keys are sensitive credentials that need to be handled with utmost care to prevent unauthorized access and potential security breaches.
Current Approach: Storing these API keys directly within our applications poses a significant security risk and creates major challenges in managing, auditing, and rotating keys across different environments.
Desired Outcome: We need a secure and centralized solution to manage and access these API keys, ensuring keys are stored in a hardened, tamper-proof environment and minimizing the risk of unauthorized exposure.
Step 1: Create and Set Up a New Azure KeyVault
Go to your Azure Subscription on the Azure Portal and search for the Key Vaults service.
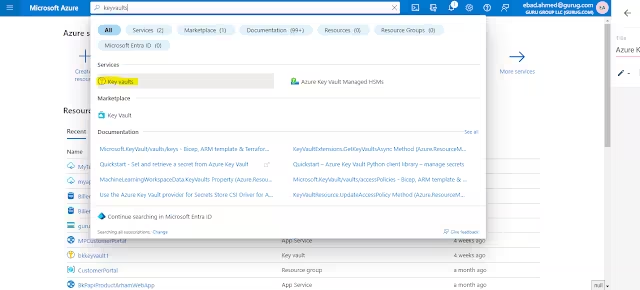
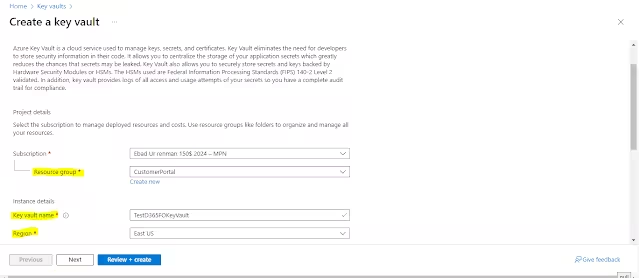
Click Create to begin configuring your vault:
- Resource Group: Select an existing resource group or create a new one by clicking “Create new” and entering a desired name.
- Key Vault Name: Give your KeyVault a unique name that clearly identifies its purpose.
- Region / Location: Choose the region where your KeyVault will be deployed (preferably matching your D365FO cloud datacenter).
After filling in the necessary details, click the Review + create button.
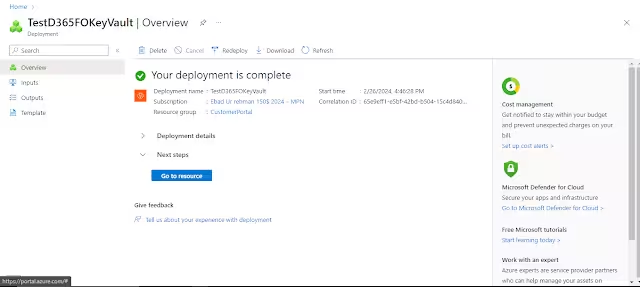
Once validation succeeds, click Create. You will observe that the deployment completes successfully:
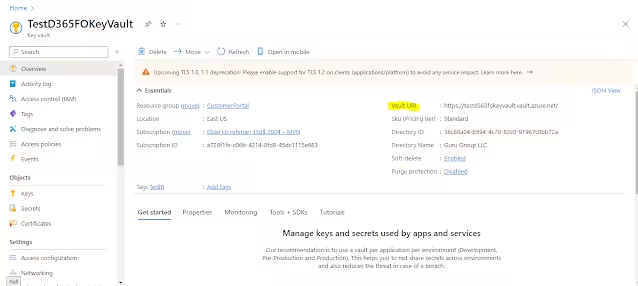
Navigate to the newly created KeyVault resource. Copy the Vault URI displayed on the Overview page—we will use this URI inside our D365FO application:
Configuring Access Control and Secrets
Navigate to Secrets on the left side of the menu to begin storing your application credentials:
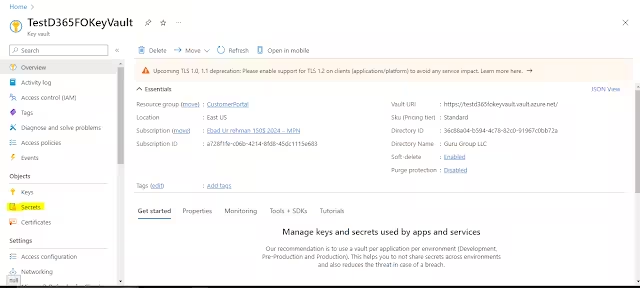
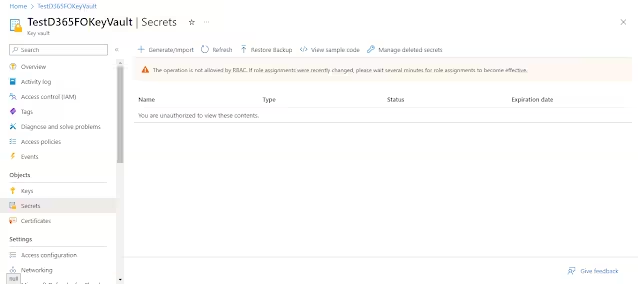
When you open the Secrets window, you may encounter an error message: “You are unauthorized to view these contents”. This indicates that your user account lacks the necessary data plane permissions to access KeyVault data:
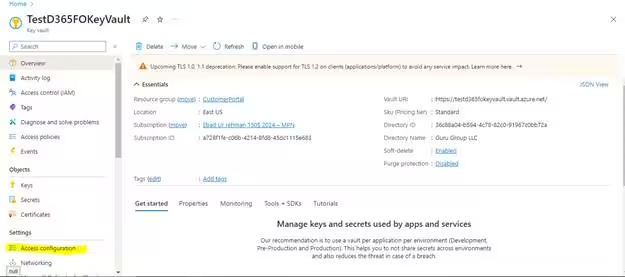
To solve this, navigate to Access configuration on the left side menu:
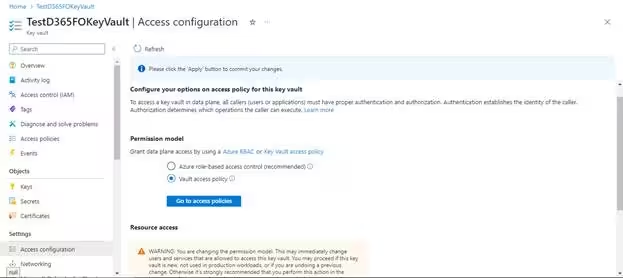
Set the Permission model to Vault access policy, which applies access control directly to the KeyVault itself. Click Apply to save changes:
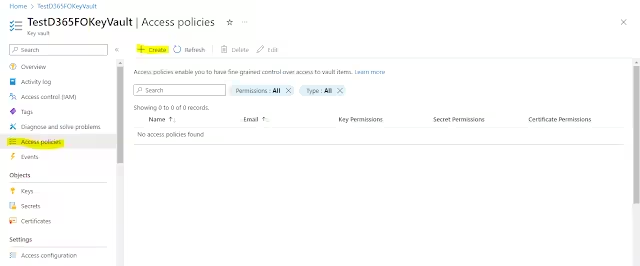
Navigate to Access policies on the left side menu and click Create:
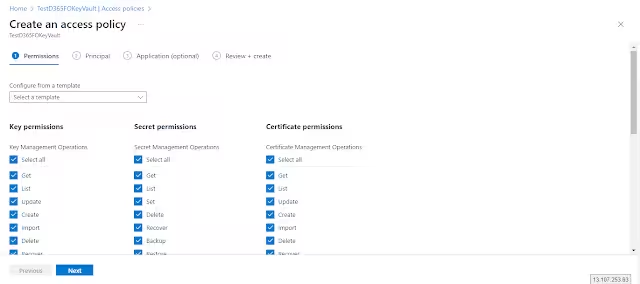
Select the required permissions for Key permissions, Secret permissions, and Certificate permissions (for administrative setup, all permissions can be selected), then click Next:
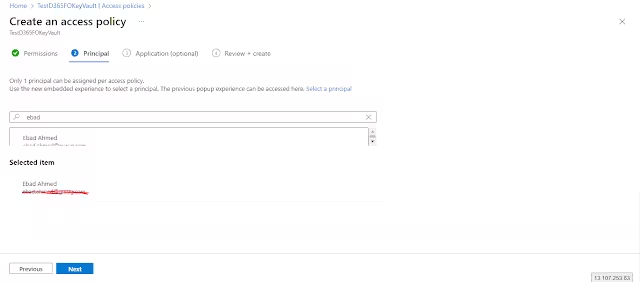
On the Principal window, search for and select the user account you want to grant access to your KeyVault, then click Next:
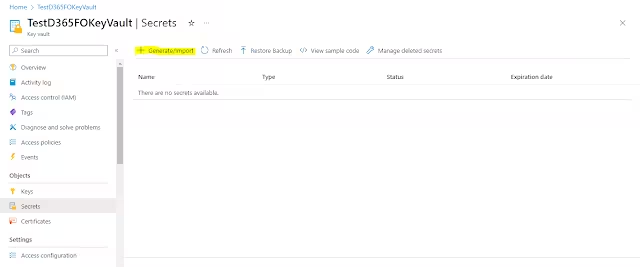
On the Review + create tab, review the permissions and click Create. Now return to the Secrets page—the unauthorized warning is resolved, and you can now use the Generate/Import button to store your secret values:
Step 2: Microsoft Entra ID (Azure AD) App Registration
Next, we will register an application in Microsoft Entra ID to allow our D365FO instance to securely authenticate against Azure KeyVault without interactive user prompts.
On the Azure Portal, search for App registrations:
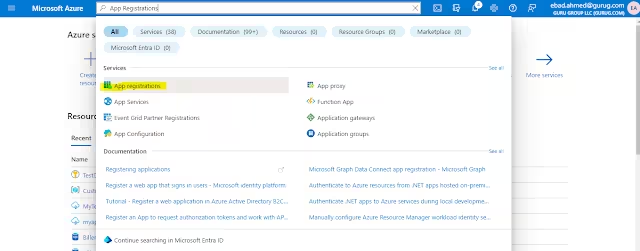
Click on the New registration button:

- Name: Give your application a descriptive name (e.g.,
D365FO-KeyVault-Integration). - Supported account types: Select Accounts in this organizational directory only (Single tenant).
Click Register. On the Overview page, copy and record the Application (client) ID and Directory (tenant) ID—we will need both inside D365FO:
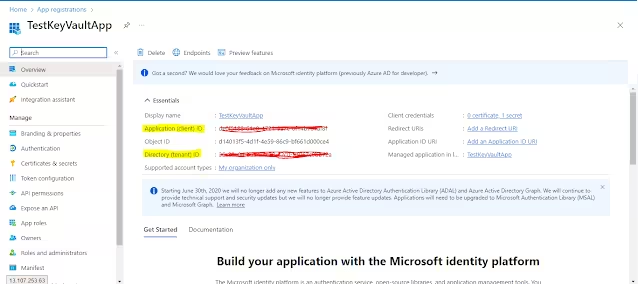
Creating the Client Secret
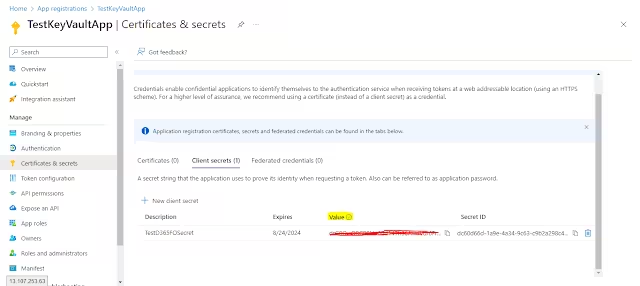
Navigate to Certificates & secrets on the left side menu:
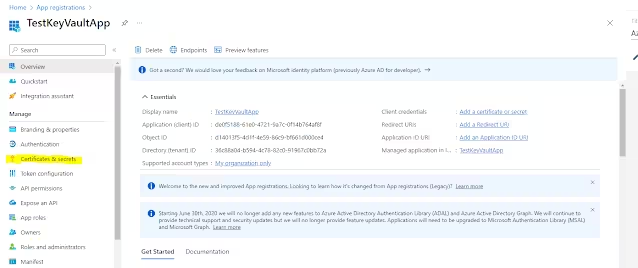
Click the New client secret button, enter a description, choose an expiration period, and click Add:
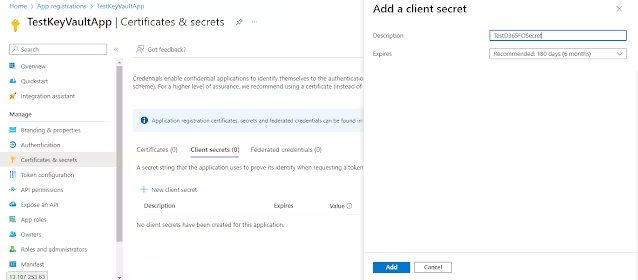
Immediately copy the secret Value (this is the Secret Key). Important: This value is displayed only once and cannot be retrieved later:
Step 3: Assign Vault Access Policy to the Registered App
Now we must grant permission from our Azure KeyVault to the Entra ID application we registered in Step 2.
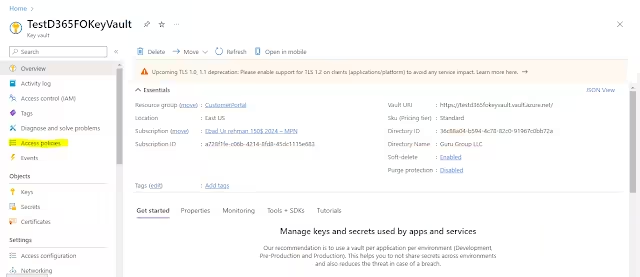
Navigate back to your KeyVault resource, open Access policies, and click Create:
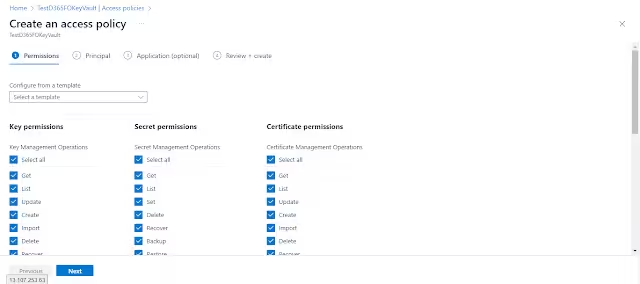
Assign the necessary Secret permissions (specifically Get and List permissions are required for D365FO runtime retrieval):
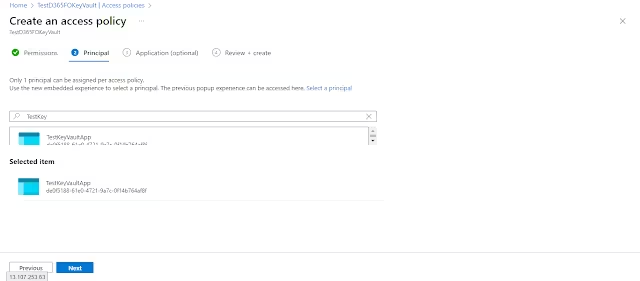
On the Principal tab, search for and select the application you registered in Step 2:
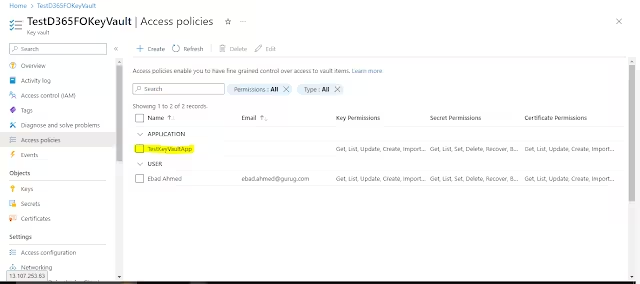
Complete the wizard and click Create. As shown below, the access policy is now assigned to the application:
Step 4: Configure Key Vault Parameters in D365FO
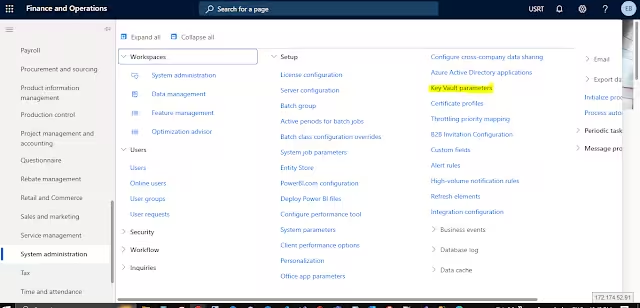
Open your Dynamics 365 Finance & Operations environment. Navigate to the following path:
System administration > Setup > Key Vault parameters
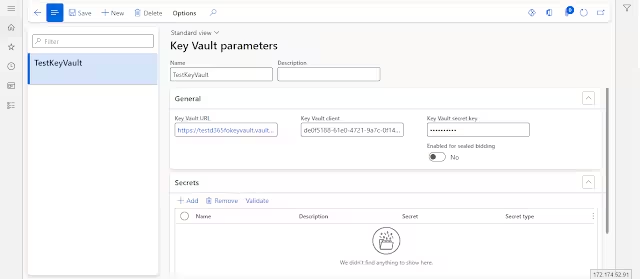
Create a new record and populate the values we obtained from Azure:
- Name: Descriptive identifier for the KeyVault configuration.
- Description: Purpose of the vault connection.
- Key Vault URL: The Vault URI copied in Step 1 (e.g.,
https://your-vault-name.vault.azure.net/). - Key Vault Client: The Application (client) ID from Step 2.
- Key Vault secret key: The Client Secret Value from Step 2.
Defining Secrets in the Subgrid
Under the Key Vault secrets fast tab, click Add to register each secret. Secret values in D365FO must follow this specific URI syntax:
vault://[keyvaultname]/secretname/[secretversion]
Note: If you omit the [secretversion] component, D365FO will automatically retrieve the latest active version of the secret.
Set the Secret type field to Manual:
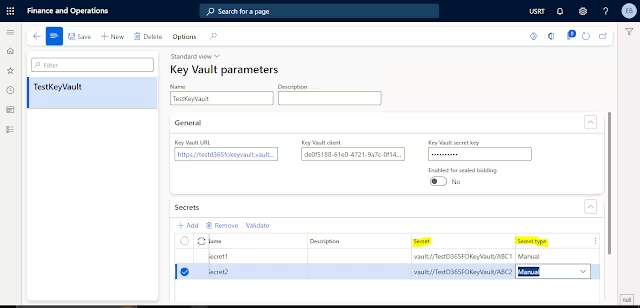
In this manner, you can register as many secrets as needed from your Azure KeyVault.
Step 5: Retrieve Secrets at Runtime Using X++
Once your Key Vault parameters and secret identifiers are defined in D365FO, you can retrieve any decrypted secret value at runtime using the standard X++ framework helper classes:
private static str getKeyVaultSecretValue(str _keyvaultSecretName)
{
    KeyVaultCertificateTable certificateTable = KeyVaultCertificateTable::findByName(_keyvaultSecretName);
    str keyvaultValue = KeyVaultCertificateHelper::getManualSecretValue(certificateTable.RecId);
    return keyvaultValue;
}
Code Analysis:
KeyVaultCertificateTable::findByName(_keyvaultSecretName)locates the parameter record defined in the Key Vault parameters form.KeyVaultCertificateHelper::getManualSecretValue(certificateTable.RecId)handles authentication with Entra ID, queries the Azure KeyVault REST endpoint, and decrypts the secret value into memory.
In this manner, you can securely retrieve third-party API keys, payment gateway tokens, and connection strings without storing credentials in code or database tables.